
PRESENTATION
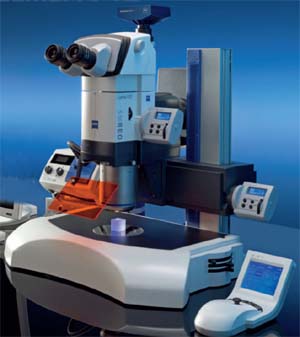
Stereo microscope with high contrast and color fidelity. Suitable for embryo observation. Automated control over magnification, focus. Manual control of contrast and brightness. Equipped with metal halide fluorescence illuminator and filter sets.
Room: 2.1.15
IP: 10.101.134.39 (why?)
Check “What are the costs” at the Users section
Zoom range: 10-120x, fully automated; controlled by Zeiss Axiovision v4.9.1 with multidimensional & extended focus
| Position | Model | Excitation (nm) | Emission (nm) | Fluorophores |
|---|---|---|---|---|
| 1 | Lumar 01 | BP 365/12 | LP >397 | DAPI, Hoescht |
| 2 | Lumar 38 HE | BP 470/40 | BP 525/50 | GFP, Alexa488, FITC |
| 3 | Lumar 15 | BP 546/12 | LP >590 | RFP, Alexa546, Alexa568, TRITC, Cy3 |
| 4 | empty |
Transmitted light illuminator
Metal halide fluorescence illuminator
Zeiss Axiocam 503 color 3MP camera
Stage temperature control for mammalian embryo/cells live imaging (by request)
BASIC PROCEDURE FOR COLOR IMAGES
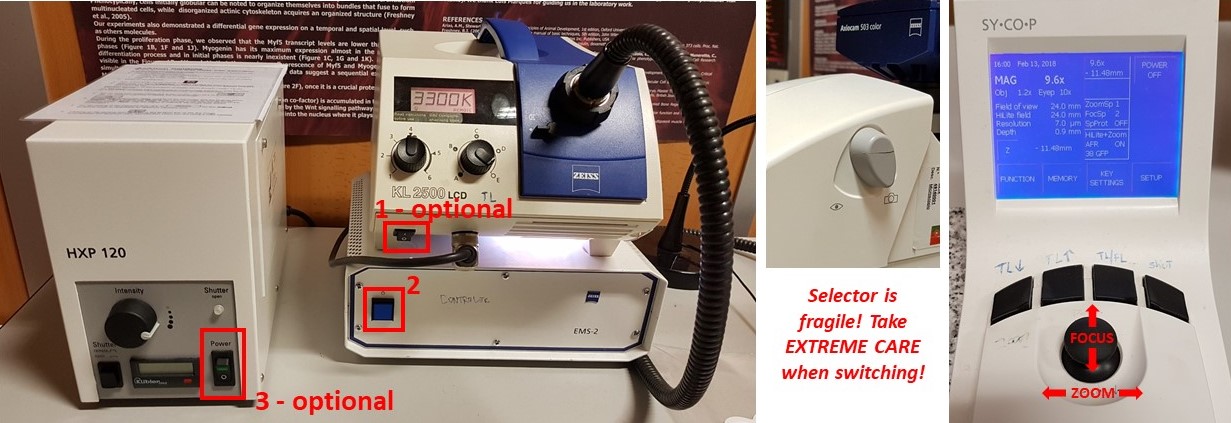
- Turn on transmitted light power source (1) if you need transmitted light illuminating your sample from below. If you need epi-illumination, turn on the white LED light ring.
- Turn on Zeiss Lumar V.12 control box (button 2 – check stereoscope powering on on control console blue LCD)
- Switch between eyepieces and camera port using the right hand side selector. Take care, selector is fragile. Adjust desired magnification and focus, using the control console joystick.
- Turn on PC and start Axiovision program.
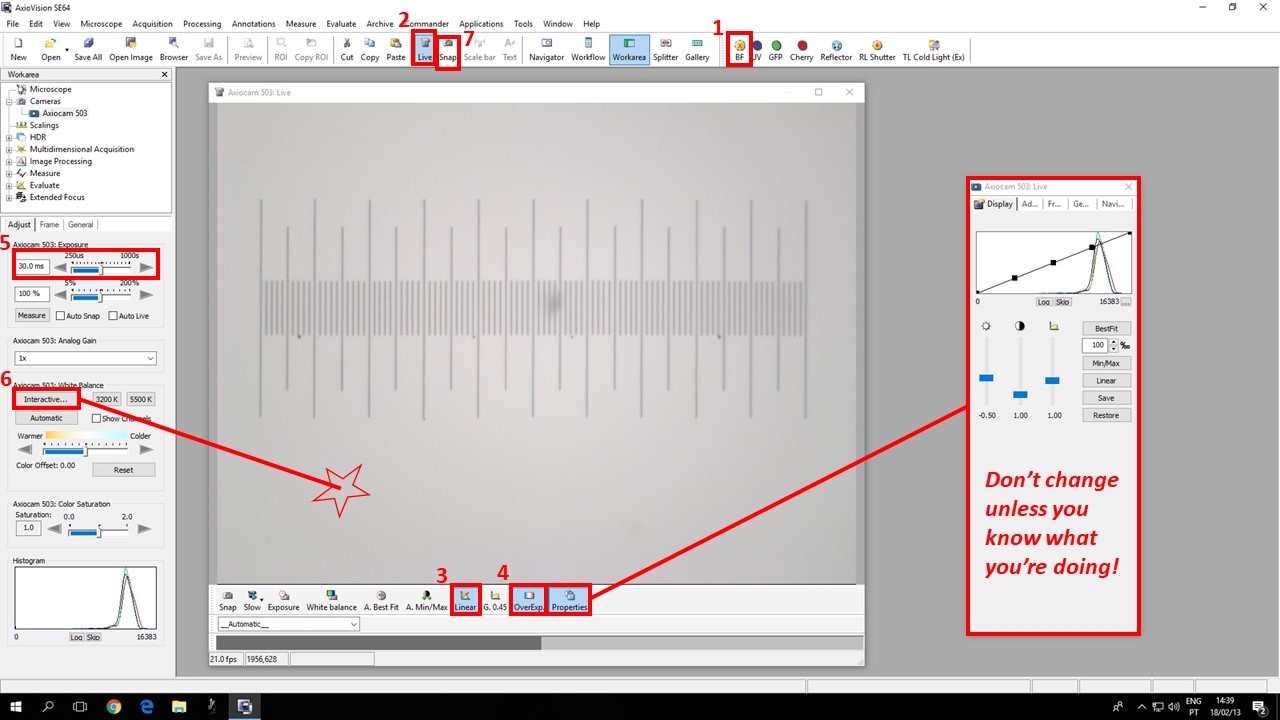
- For color images, press button 1 (BF) for empty filterwheel selection.
- Switch to camera port on the right hand side selector, and press button 2 (Live).
- Use Linear Histogram (button 3), and click the Overexposure “red pixels” button (button 4). Do not change Camera Properties like Brightness, Contrast, or Gamma, unless you know what you’re doing and wish to do pre-processing.
- Adjust Camera Exposure (button 5) until the histogram curves barely reach the right of the histogram (white pixels – appear in red in the image). Depending on the kind of illumination or the color of your background, you may need to fiddle with this setting. Always avoid excess white saturation.
- Click the White Balance Interactive picker (button 6) and click on a blank, white-ish area of your image.
- Click Snap (button 7) to acquire an image.
- If you wish to acquire images with proper micrometric calibration for each magnification, you MUST save them in the proprietary Zeiss ZVI format. You can convert these to a spatially calibrated RGB TIFF in FIJI using this macro. Save your images in your image folder.
- When you’re done with your work, switch everything off in reverse order.
Zeiss Lumar V.12 can also acquire multidimensional images (z-stacks, time lapses, fluorescence channels). If you need these, please ask Telmo or Luís for assistance.
PEOPLE RESPONSIBLE FOR THE EQUIPMENT
 |
 |
| Telmo Nunes
FCUL Microscopy technician mevarrimento@fc.ul.pt Room 2.1.15 |
Luís Marques
FCUL Microscopy technician lfmarques@fc.ul.pt Room 8.1.79 / 2.1.15 |