
PRESENTATION

The Leica TCS SP8 is a fully motorised high-resolution spectral confocal system,
based on a Leica DMI8 microscope, with High Content Screening (HCS), Fluorescence Lifetime Imaging (FLIM) capabilities, and Temperature/CO2/Humidity control.
Location: 8.1.71
Computer name: leica-sp8st-ws / 10.101.93.149 (why?)
| Pos | Mag | NA | IM | Corr. | WD | Glass | Color Code | Pixel size | Step size |
|---|---|---|---|---|---|---|---|---|---|
| 1 | 10x | 0.4 | Air | HC Plan Apo | 2200 um | 0.17 mm (#1.5) | |||
| 2 | 20x | 0.75 | Air | HC Plan Apo | 620 um | 0.17 mm (#1.5) | |||
| 3 | 63x | 1.4 | Oil | HC Plan Apo | 140 um | 0.17 mm (#1.5) | |||
| 4 | |||||||||
| 5 | |||||||||
| 6 |
Pos Position
Mag Magnification
NA Numerical Aperture
IM Immersion Medium
Corr. Correction Type
WD Working Distance
Glass Coverglass
Pixel size @ 1024×1024; 1x zoom
Step Confocal section thickness (1 AU)
| Position | Excitation (nm) | Emission (nm) | Fluorophores | Model |
|---|---|---|---|---|
| 1 | 450-490 | LP 515 | GFP, Alexa488, cy2, FITC | FITC |
| 2 | ~517- ~562 | LP 590 | mCherry, YFP, cy3, Alexa546, Alexa568, TRITC | TRITC |
| 3 |
For eyepieces only!
Transmitted light
White LED
Fluorescence
Mercury metal halide bulb
Lifetime: 2000 hours
Integrated fast shutter
Laser lines
405 nm, 488 nm, 552 nm and 638 nm
Confocal
3-channel spectral detector + PMTs (400-800nm), 1 transmitted light detector;
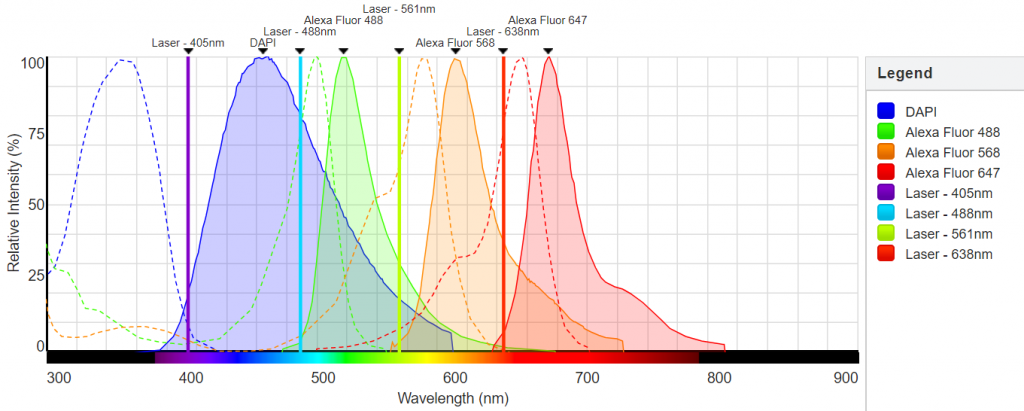
(non-normalised spectra; “green” laser is 552)
X Y Z T Lambda acquisition
Widefield
Monochrome CMOS camera 4.0 MP (2048 x 2048 pixels)
Pixel size 6.5 μm × 6.5 μm
Bit depth 16 bit
Peltier cooling
Time Correlated Single Photon Counting (TCSPC)
WL: 470 nm pulsed laser
Frequency (MHz) Max Power (mW) Time window (ns) 40 4.3 25 20 2.4 50 10 1.2 100 5 0.57 200 2.5 0.29 400
Minimum Pulse : 64 ps
IRF: ~30 ps
Maker: PicoQuant
Model: LDH-P-C-470B
Detector: 2nd gen Leica HyD, with photon counting
Immersion oil (RI 1.5180)
Stage inserts for slides, well plates, and 60mm dishes
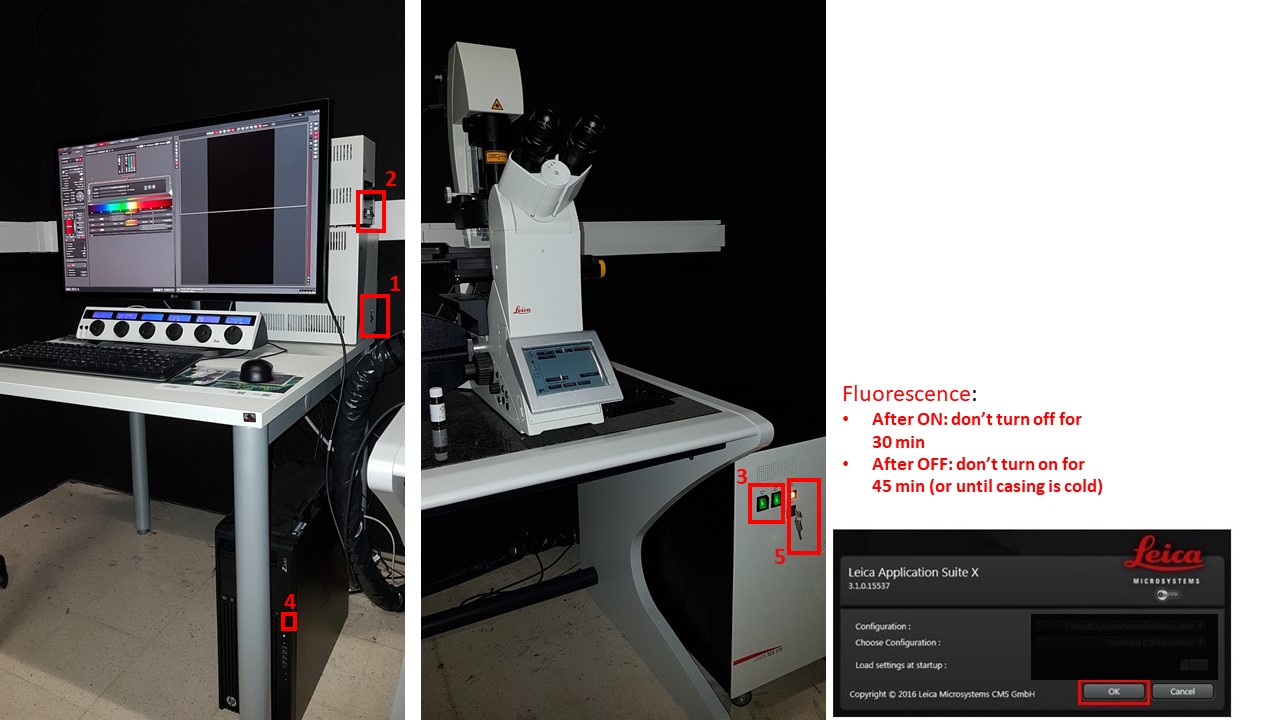
- Check that the objective revolver in the microscope is at its lowest magnification lens. Turn on microscope control box (1). Allow motorized stage to finish full range of motion for calibration.
- Turn on fluorescence (2), confocal control box (3), and switch on the computer (4). Switch on laser power by turning the (5) key.
- Start LAS X program and click “Ok”.
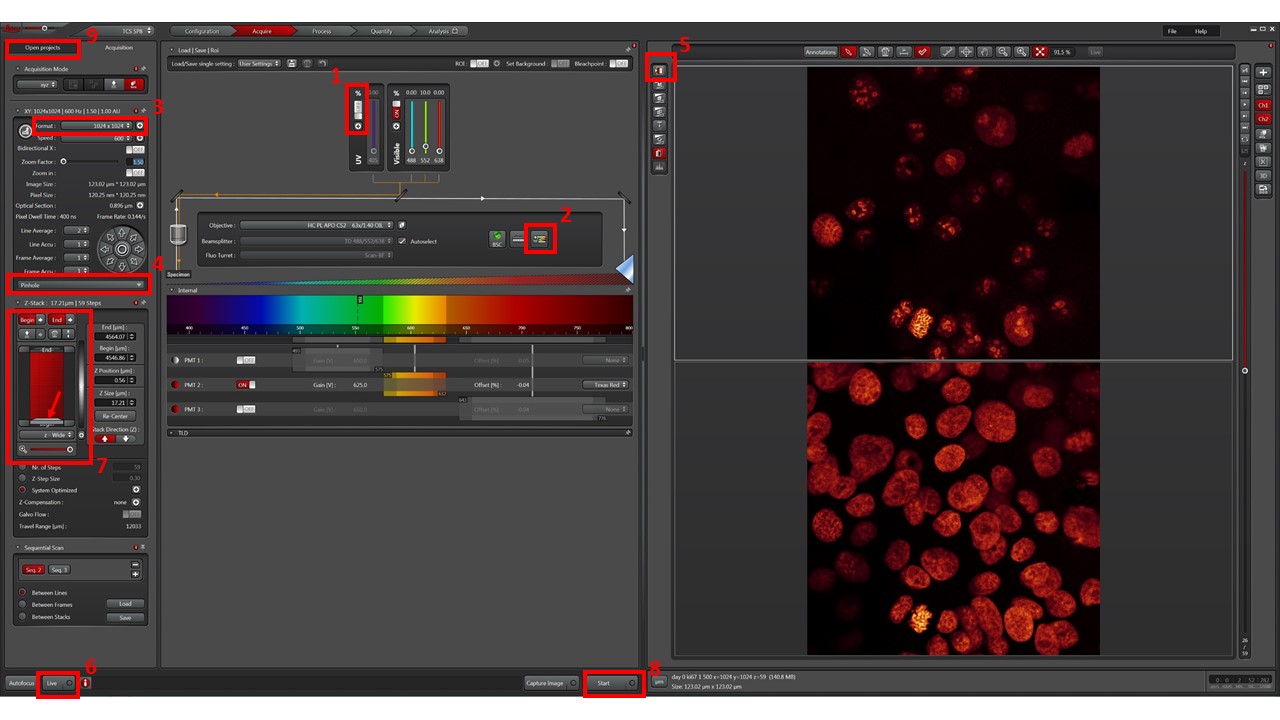
- Press the “+” button (1) and turn on the laser lines you need to use. Unlock them by pressing the “%” On/Off switch.
- Use Dye Assistant wizard (2) to setup your laser path and detector settings. Pick through the fluorophores you wish to use (maximum 4), and assign the desired color lookup tables to each one. Usually, DAPI/Hoechst (cyan), Alexa488 (green), Alexa568 (red), Alexa647 (magenta), for example.
- Pick the setting that gives maximum signal and minimum signal bleedthrough. “Sequential” acquisitions usually minimize bleedthrough at the expense of speed. Still, Sequential Scan Between Lines will enable good signal, minimal bleedthrough, and good speed for 3 fluorophores. Press “Apply”.
- Pick image format (3). 1024×1024 is a good compromise for speed/quality, at 600Hz scanning. If Nyquist sampling is desired, adjust zoom for desired field of view and, and click Auto button to adjust needed resolution for that zoom level.
- To ensure proper confocal / optical slice acquisition, keep Pinhole (4) at Airy 1 for each sequence / fluorophore.
- Cycle through viewing lookup tables (5) and pick the “saturation” one. Grey levels will appear as reddish-brown, black pixels will show in green and white pixels will show in blue. This will help you choose proper laser power and gain for each channel.
- Select a low magnification objective – 10x is a good starting point. Press the “Fluo” selector button on the microscope touch console, one of the fluorescence cube buttons (FITC or TRITC), and then the “Shutter” button. Look through the eyepieces, move through your slide with the X-Y-Z joystick, and bring your sample into focus.
- Click “Live” (6) to preview image.
- Adjust laser power and gain for each sequence, so that you get an image with very little saturated (blue) pixels. Start at 650 gain and increase to no more than 850 – will image will become very noisy. Increasing laser power (start at 1%) will give more signal, but will bleach your sample faster.
- Adjust offset for each sequence so that you see a black background with only a few black/green pixels.
- If you wish to acquire a single optical slice, press “Start” (8) to begin acquisition.
- If you wish to do a stack, click on the light grey bar (arrow in 7) and then use the mouse wheel (or z-joystick, or z-knob) to travel through your sample in z. Go “up” and set your desired Begin point, and go “down” and set your desired End point. If using the immersion objective, take care not to hit the slide with the objective (the image will typically become “frozen” in place).
- To see your whole programed stack, use the zoom slider underneath the stack window. DO NOT USE the small dark grey bars on the side!! These quickly move the objective revolver and may cause you to hit the slide.
- Pick number of acquisition steps in you stack. For optimal Z-resolution (i.e. if you wish to do 3D reconstruction), choose System Optimized.
- Press “Start” (8) to begin acquisition. If you change objective, readjust settings.
- Your acquisitions will be gathered as *.lif files, in the “Open projects” tab (9). Save it in your image folder. You may create “collections” inside *.lif files by right-clicking on them. A typical structure may be [Project: Experiment name or Date] \ [Collection: slide name or number] \ [Image: name of experimental condition]
- When your work is done, check if anyone is using the microscope after you. If not, press the “%” On/Off to OFF, and click on the “+” button (1) to turn off the lasers. Exit LAS program.
- Turn the laser power key to off, and switch off the lasers control box (green switch).
- Switch off the microscope control box, and the fluorescence.
- Cover the microscope with the plastic cover, taking care not to force any cabling.
This microscope allows xz / yz imaging and stage experiments (mosaic and mark & find with stacks). Contact Luís for further help with these settings.
To open the images you can either use the Leica LAS X Core software (Windows only!) or FIJI with the latest Bio-Formats plugin installed
BioISI users: 0 €/h
External users with BioISI collaboration: 30 €/h
External users: 50 €/h
PEOPLE RESPONSIBLE FOR THE EQUIPMENT
 |
 |
|
Room 8.1.76 |
Luís Marques
FCUL Microscopy technician lfmarques@fc.ul.pt Room 8.1.79 / 2.1.15 |